Let's explore the advanced options available for Q&A and how to configure them using the authoring UI.
To access these settings, start by launching Q&A authoring. You can do this by going to the Q&A home page and clicking on the "+ Create" button.
Next, complete the required fields, choose audience interactivity settings by selecting an audience channel and providing a title. Once done, click on "Advanced Settings" to proceed.

Let's take a closer look at the advanced settings and go through them step-by-step.
- Audience, title, message, and alias
On the initial screen, you can choose a sender alias along with the audience selection, title, and optional message to attendees.The alias will be displayed as the author of the Q&A and in any responses written for the audience.
-
Add collaborators, moderation, anonymity, voting, and replies
Add collaborators: On the configuration screen, you have the option to invite other collaborators to the Q&A. These collaborators can help moderate submissions and respond to them. However, only the author has the ability to edit or close the Q&A. You can add or remove collaborators at any time after the Q&A has been created.Moderation: If desired, you can also disable moderation, which will make all submissions public by default. Keep in mind that if you enable moderation later on, it will only apply to new submissions.
Audience settings: In the audience settings, you can choose to enable or disable voting (upvoting, or upvoting and downvoting), as well as toggle anonymity. By default, audience members can post submissions anonymously, but turning off anonymity will make all posts public.
It's important to note that once a Q&A is created, you cannot edit it to remove anonymity. This is to protect the privacy of audience members who may have already submitted posts anonymously. However, you can edit a Q&A to add anonymity if it was initially turned off.Voting: When voting is enabled, you can choose to allow upvoting only or both upvoting and downvoting. Audience members can then upvote submissions to indicate relevance, or downvote them when they are less relevant.
How it works:
- Audience can apply one vote per submission at a time (upvote or downvote)
- Selecting the same option again will prompt a confirmation to remove their vote
- Switching between upvote and downvote will prompt a confirmation
- The first vote is applied immediately
-
When downvoting is enabled, submissions are sorted by Most Popular, based on the net score (upvotes − downvotes).
✏️ Note: How scoring works:
- Positive scores are shown as a number
- Neutral or negative scores with votes are displayed as
<0in audience-facing views - A score of 0 with no votes is shown as 0
Text Replies: Text replies are written responses to submissions. Facilitators can submit these responses privately for review or publicly for all to see.
Here you can configure a number of settings that impact the audience's participation experience:
-
- Submission Visibility
Here you control how public submissions, public replies, and upvotes appear for audience members in Slack. Chose between posting each submission as a separate message vs keeping everything in a single Slack thread vs a web only experience.
Notes:
- These settings only allow you to manage the audience's experience in Slack.
- In all scenarios, a starting Q&A message will be posted in the selected Slack channel, giving audience members the ability to add new submissions.
- Submissions can also be viewed and upvoted on through the View Public Submissions modal but it won't have public replies.
They can not be edited after your Q&A has gone out.
Slack Channel: All public submissions will get posted in the Slack channel you've selected as a new post. Public replies to a submission will get posted in a thread and you can also upvote on the submission itself.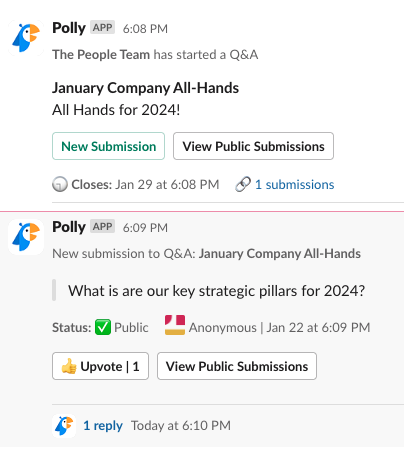
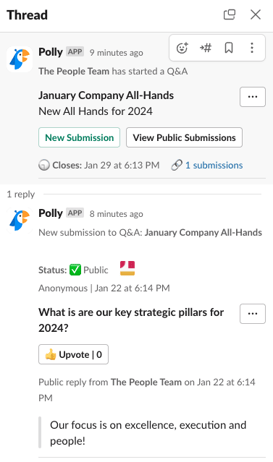
Slack Thread: All public submissions will be consolidated into a single thread under the Q&A post in the chosen Slack channel. Non-anonymous submitters will be mentioned in the thread and will receive notifications for any new messages, unless they decide to opt out.
Public replies also get posted in the thread and submissions can be upvoted either through the View Public Submissions modal or the messages in the thread.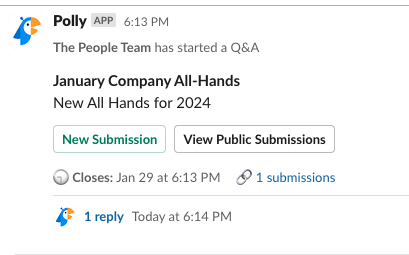
Notifications: Every time a submission is made the sender will get a Slack notification as they will be automatically @mentioned on the reply. To disable this, unselect the @mentions option:
Only on the Web: Q&A and submissions will only be accessible through the web link and will not be posted on Slack.
- Link Configuration
The web voting link is a great way to engage audience members and encourage their participation. To maximize participation, it is recommended to share this link in various Slack channels, emails, meeting invites, and your company intranet.
For company-wide all hands or other internal Q&A sessions, we recommend using a "protected" link. This means that audience members will need to authenticate using their Slack credentials for your workspace. By default, this setting is enabled.For workshops, training sessions, and other widely attended Q&A sessions, you have the option to use a Public link. With this link, anyone who has access to it can participate as a Guest in the Q&A session.
Alternatively, if you prefer, you can also turn off web voting entirely.

💡 Private replies cannot be sent to guest submissions
-
Participant QR Code
A QR code is displayed on the presentation view which audience members can scan to participate in the session. Here you can configure where participants are directed after they scan it.By default, audience members will get directed to the web voting link - this way they are unlikely to run into issues on their mobile devices if they’re not logged into Slack
The second option redirects users to a landing page, allowing them to pick either Slack of the web voting link
Slack only is the final option and the default one if web voting links are off. In this case users are redirected to the Slack app and the in-channel Q&A post.
If the Q&A is only being presented on the web then you will only see the option to toggle it on/off.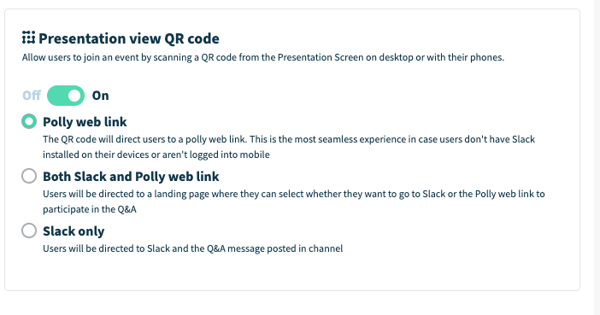

4. Scheduling a Q&A
You can schedule a Q&A session for a future time and it will be posted to the selected Slack channel. However, audience web links will only be active once the session is live. You can also set a close date for the Q&A. Keep in mind that a scheduled session will be in a Pending state initially, so you can make edits to its settings before it goes live. - Submission Visibility
💡 Scheduling option is only available if the Q&A is being sent in Slack and does not appear if it is only being presented on the web using the web link only option.

If you change your mind, you can always come back to the Q&A settings and click on send now to publish it immediately.

✏️Note: You can now collaborate on Q&A via Slack user groups. Learn more about it here.