You must be wondering what the heck a Polly workflow is. We’ll get into the details of what exactly a workflow is, and some common questions we’ve received.
The best part? You can create most workflows with Polly without having to write a single line of code. For more advanced trigger setups, you can use our API to programmatically kick off workflows — check out our API docs to get started.
In this help doc, we'll walk you through creating your first Polly workflow, so you can collect ongoing feedback on your day-to-day work without the mundane task of having to set up manual surveys every time.
What’s a workflow?
Polly lets you create custom single or multi-question workflows (or use any of our pre-built workflows) for Slack so that you can collect and measure feedback at scale.
We’ve designed workflows to be incredibly simple to set up, and you don’t need to be a developer to create a workflow. You can use our API as a trigger to kick off workflows programmatically based on external events with our API.
✏️Note: Workflows are an add-on only available on our Enterprise plan. More around what the Enterprise plan offers can be found on our pricing page
How do I create a workflow?
A workflow is comprised of a few core components: the trigger, the survey(s), survey audience, and the survey delivery. We'll go over what each of the components means, what you can do with them, as well as how to set it up. Some key terminologies are:
- Trigger
- Advanced trigger options
- Surveys to Send
- Custom vs. Global workflows
⚡Trigger
A trigger is an event that takes place that kicks off your workflow. This is the event that Polly will look out for so Polly knows to start the workflow whenever the trigger happens.
For example, if the trigger is a certain emoji reaction on a message within a specific channel, every time that emoji is used as a reaction to a message, it will kick off the workflow. The 5 triggers available currently are:
- Slack workspace joined:
Every time a new member is added to your Slack workspace, it triggers the workflow. Example if you have a dedicated community workspace that your customers join for onboarding and general questions, you can send an NPS question a few weeks into them becoming your customer based on when they joined the customer workspace.
- Slack channel joined:
Every time a user has joined a specified channel, it triggers the workflow.
Example for channels dedicated to cohorts of new hires, new channel members can give feedback on how their onboarding experience was like with their cohort.
- Emoji reaction:
You can choose any emoji, from the standard emoji library or a custom emoji that you use within your workspace. For custom emojis, you'll need to type in the correct emoji shortcut (e.g. :ThisIsAnEmoji:) but for standard emojis, you can just copy-paste the emoji into the field if you don't feel like typing out the emoji shortcut.
Emoji reactions as the workflow trigger is scoped to a channel and emoji combination: meaning, for every time an emoji reaction like is used in a specified channel, it kicks off the workflow. Example for approval processes using emoji reactions (such as ✅ to signal it's been approved, it kicks off a follow-up survey)
- Slash command:
Whenever you want to kick off your workflow, especially for something that is more ad-hoc, you can trigger it manually by using the command /polly workflow and pick the correct one from the drop-down.
Example adhoc processes such as software implementation rollouts, you can manually trigger them with a simple slash command to collect mass feedback from the right audience - API:
You can programmatically kick off the workflow with an API call – for more info, check out our docs.
Example with the Polly API connected to Salesforce, for every closed opportunity, a quick post-mortem survey will send out to the Owner about the lost/won lead.
Advanced Trigger Options
Under the trigger drop-down, you have the option to display trigger data with the polly. The trigger data is essentially additional information that you might want to include in the surveys for context. By default, trigger data is not included but you can choose to do so.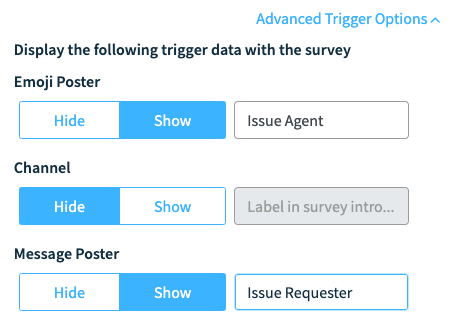
Additionally, you have the option to rename (such as channel name, @displayname, emoji reaction, etc.) to something else that’s more suited for your workflow.
Pollys to Send
Similar to normal polly templates, you choose a template to send to your specified audience whenever the trigger is hit.
From the template drop-down, you can choose from any library templates that you have (either surveys you have saved as a custom template, or global Polly templates that you have saved to your library) or from any of our pre-built global templates. You can choose to send immediately (as soon as the trigger is hit) or delay it. The default delivery is immediately after trigger or you can schedule it a specified number of days after trigger (such as, 7 days after trigger). Your options for delivery can be in minutes, hours, days, weeks, or years after the trigger.
For multi-question pollys within a workflow, it’s best to order them in chronological order. For example, a new hire workflow could look something like: 1st polly on day 7, 2nd polly on day 30, and so on so forth.

✏️Note: You can't use rotating pollys in workflows which is why templates with this polly type will not show in the template drop-down selector menu.
For templates used in workflows, they will be automatically duplicated from the original template in your library and serve as a duplicate copy in the workflow. These copied templates will only live within the workflows, and any changes made to the template copy that lives in your template library will not reflect in the template copied to your workflows. This is to prevent errors in reporting and analytics when drastic changes are made to the original template unintentionally when used elsewhere.
💡Pro Tips
- Get workflows set up faster by selecting a pre-existing template in your library
- We encourage you to create these survey templates before creating a workflow, and saving them to your template library. We recommend giving them names such as Onboarding Workflow Survey 1 and Onboarding Workflow Survey 2 and so on so forth so that you can easily find and use the right ones.
- Double and triple check your workflow before you hit Save – once the workflow is running, you can only tweak certain parts
- You can collaborate via Slack user groups to share and manage workflows. Learn more about it here.
Custom vs. Global workflows
Custom workflows are workflows that you build from scratch using the workflow builder, and you can spin up as many custom workflows as your heart desires.
Global workflows are commonly used workflows that Polly has provided as a starting point — with everything already filled out and included for you, including the polly templates. There’s only a handful of global workflows to start, but we’ll continue to add more integrations and workflows. Got a suggestion for a global workflow? We’d love to hear it.💙

Have more questions around workflows? Our frequently asked questions might be able to help you
✏️Note: Responses received on pollys sent via workflows also get counted in your response limit. If you add someone with "can manage" permissions to the workflow, the responses count against the response limit of the original author of that workflow